
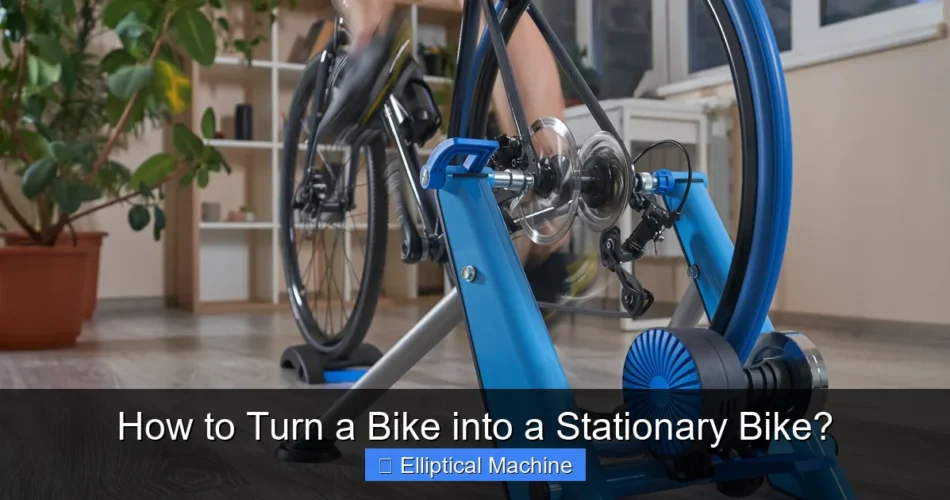
How to Turn a Bike into a Stationary Bike? The process involves securing your bicycle onto a specialized indoor trainer, transforming it into a versatile home fitness solution. This practical approach allows you to continue your cycling regimen regardless of weather conditions or time constraints, offering an efficient way to stay active indoors.
Converting your existing bicycle into a stationary one is a cost-effective and space-saving alternative to purchasing a dedicated exercise bike. This method provides the familiar feel of your own bike, making indoor training comfortable and effective for various fitness levels and cycling goals.
Quick Answers to Common Questions
Do I need special equipment to turn my bike into a stationary bike?
Yes, you’ll primarily need a bike trainer. This essential piece of equipment holds your bike steady and provides resistance, effectively transforming your regular bicycle into a stationary bike.
Is it stable and safe to use a regular bike as a stationary bike?
Absolutely! When correctly installed on a quality bike trainer, your bicycle will be very stable and safe for indoor use. Just ensure the trainer is on a level surface and your bike is securely clamped.
Can any type of bike be converted into a stationary bike?
Most standard road bikes and mountain bikes can easily be converted into a stationary bike with the right trainer. Always check the trainer’s compatibility with your bike’s wheel size and axle type for the best experience.
📑 Table of Contents
Why Convert Your Bike? Benefits of Indoor Cycling
Transforming your outdoor bicycle into an indoor cycling station offers a multitude of advantages, making it an increasingly popular choice for fitness enthusiasts. Beyond just exercising when outdoor conditions are unfavorable, this setup provides a controlled training environment essential for focused workouts.
Weather Independence and Convenience
- Consistent Training: Rain, snow, extreme heat, or even darkness no longer dictate your workout schedule. An indoor setup ensures you can maintain a consistent training routine year-round.
- Time Efficiency: Eliminate travel time to and from a gym or the need to plan routes. Simply hop on your bike at home whenever you have a spare moment.
- Safety: Avoid traffic, potholes, and other road hazards that come with outdoor cycling. Indoor training offers a safe environment, particularly valuable for beginners or those recovering from injury.
Cost-Effectiveness and Performance Gains
- Affordable Alternative: Investing in a bike trainer is generally much more affordable than buying a dedicated stationary bike or an indoor smart bike. You’re leveraging equipment you already own.
- Specific Training: Indoor cycling allows for precise control over resistance and cadence, making it ideal for structured interval training, tempo rides, and recovery sessions without external distractions.
- Familiar Feel: Riding your own bike means you retain your personalized fit, saddle, and handlebars, leading to greater comfort and a more natural riding experience compared to a generic gym bike.
Essential Equipment for the Transformation
To successfully convert your bike into an effective stationary cycling machine, you’ll need a few key pieces of equipment. The core component is the bike trainer, which provides resistance and stability. Beyond that, several accessories can significantly enhance your experience.
The Bike Trainer: Your Core Component
Bike trainers come in various types, each with its own advantages:
- Wheel-on Trainers: These trainers clamp onto the rear wheel axle, and the rear wheel itself rests on a roller that provides resistance. They are typically the most affordable and easiest to set up, but can be noisier and cause tire wear.
- Direct-Drive Trainers: These replace your bike’s rear wheel entirely, attaching directly to the bike’s drivetrain. They are generally quieter, offer more accurate power measurement, and provide a more realistic ride feel. They are also more expensive but eliminate tire wear.
- Rollers: Less common for stationary conversion but worth mentioning, rollers consist of three drums on which you balance and ride your bike freely. They require more skill and offer a more dynamic, skill-building workout.
Crucial Accessories for Comfort and Functionality
- Riser Block (Front Wheel Support): This raises your front wheel to match the height of your rear wheel on the trainer, ensuring a level and comfortable riding position.
- Trainer Mat: Placed underneath your bike and trainer, a mat protects your floor from sweat and vibrations, also helping to dampen noise.
- Fan: Essential for cooling. Indoor cycling generates a lot of body heat, and a good fan prevents overheating, making your workout more comfortable and effective.
- Sweat Guard: A fabric cover that stretches between your handlebars and seat post, protecting your bike’s frame and components from corrosive sweat.
- Smartphone/Tablet Holder: For entertainment, training apps, or virtual cycling platforms like Zwift or Peloton.
Step-by-Step Guide to Setting Up Your Indoor Cycling Station
Once you have your essential equipment, setting up your indoor cycling station is a straightforward process. Follow these steps to get your bike ready for stationary use.
Choosing the Right Trainer Type
Before setup, confirm the compatibility of your bike with your chosen trainer. Most trainers accommodate standard road and mountain bikes, but axle types (quick release vs. thru-axle) and wheel sizes might require specific adapters. Consult your trainer’s manual for details.
Securing Your Bike to the Trainer
- Preparation: If using a wheel-on trainer, ensure your rear tire is properly inflated. For direct-drive trainers, remove your rear wheel.
- Mounting: Attach your bike’s rear axle to the trainer’s clamping mechanism. For quick-release skewers, ensure it’s tight and secure. For thru-axles, install the appropriate adapter and fasten securely.
- Front Wheel Support: Place your front wheel onto the riser block. This stabilizes the bike and levels your riding position.
- Safety Check: Gently rock your bike from side to side and try to lift it off the trainer to ensure it’s firmly secured and won’t detach during your ride.
Calibration and Initial Setup
For smart trainers or those with power meters, follow the manufacturer’s instructions for calibration. This often involves a short spin-down test to ensure accurate power and speed readings. Always test your setup with a short, easy ride before embarking on an intense workout to ensure everything feels stable and comfortable.
Enhancing Your Stationary Cycling Experience
Simply mounting your bike on a trainer is the first step. To truly enjoy and benefit from your indoor cycling sessions, consider optimizing your environment and incorporating smart technology.
Comfort and Stability
- Level Surface: Ensure your trainer is on a flat, stable surface. Uneven floors can lead to wobbling and discomfort.
- Ventilation: Position your fan strategically to direct airflow over your body. Multiple fans can provide even better cooling.
- Hydration and Nutrition: Keep water bottles and any necessary nutrition within easy reach. Staying hydrated is crucial for indoor workouts.
- Trainer Mat: As mentioned, a mat not only protects your floor but also absorbs some vibration and noise, making for a quieter, more pleasant experience.
Smart Training Integration
Modern trainers, especially direct-drive smart trainers, often connect wirelessly via ANT+ or Bluetooth to various apps and devices:
- Virtual Cycling Platforms: Apps like Zwift, Rouvy, and TrainerRoad offer immersive virtual worlds, structured workouts, and competitive races. These platforms can control your smart trainer’s resistance to simulate terrain or prescribed intervals.
- Heart Rate Monitors: Pairing a heart rate monitor (chest strap or optical) provides valuable data for training zones and effort tracking.
- Cadence Sensors: If your trainer doesn’t have built-in cadence, an external sensor can help you maintain consistent pedal strokes.
Entertainment Options
Indoor cycling can sometimes feel monotonous. Keep yourself engaged with:
- Music: Create energizing playlists.
- Podcasts/Audiobooks: Perfect for longer, steady-state rides.
- TV Shows/Movies: Position a screen in front of your bike for distraction.
- Virtual Cycling Apps: The interactive nature of these apps can make hours fly by.
Maintenance and Troubleshooting Tips
Regular maintenance will extend the life of your bike and trainer, ensuring your stationary setup remains reliable and ready for use. Addressing common issues promptly will prevent minor problems from escalating.
Regular Cleaning and Inspection
- Wipe Down Your Bike: Sweat is corrosive. After every ride, wipe down your bike’s frame, handlebars, and components with a damp cloth to remove sweat.
- Clean Drivetrain: Regularly clean and lubricate your chain, cassette, and chainrings, especially if you’re using a wheel-on trainer, as dirt from the tire can get picked up.
- Check Trainer Connections: Periodically inspect all bolts, clamps, and connections on your trainer to ensure they are tight and secure.
- Tire Pressure (Wheel-on Trainers): Maintain consistent tire pressure for optimal roller contact and resistance. Check before each ride.
Common Issues and Solutions
- Noise: If your setup is noisy, check for loose parts on the trainer or bike. Ensure the trainer is on a mat. For wheel-on trainers, a smooth, slick tire (vs. knobby mountain bike tire) can significantly reduce noise.
- Wobbling/Instability: Confirm the bike is securely clamped to the trainer and that the front wheel is properly seated on the riser block. Check that the trainer feet are level and firm on the ground.
- Inaccurate Readings: For smart trainers, perform a calibration (spin-down) regularly. Ensure all sensors (speed, cadence, power) are properly installed and have fresh batteries.
- Tire Wear (Wheel-on Trainers): Use a dedicated trainer tire. These are designed to withstand the heat and friction generated by the trainer roller, lasting much longer than road tires.
Comparative Overview of Trainer Types
Understanding the differences between trainer types can help you choose the best option for your budget and training goals when considering how to turn a bike into a stationary bike.
| Feature | Wheel-on Trainer | Direct-Drive Trainer | Rollers |
|---|---|---|---|
| Price Range | Low to Mid | Mid to High | Mid |
| Setup Time | Quick | Moderate (rear wheel removal) | Quick |
| Noise Level | Moderate to High | Low to Moderate | Low |
| Ride Feel | Less realistic | Very realistic | Dynamic, skill-based |
| Tire Wear | Yes (can use trainer tire) | None | None |
| Accuracy (Power) | Variable (often estimated) | High (often built-in) | None (needs external sensor) |
| Stability | High | Very High | Requires balance, lower for beginners |
| Connectivity (Smart) | Some models | Most models | Rarely (needs external sensor) |
Conclusion
Converting your existing bicycle into a stationary training tool is a highly effective, versatile, and often economical way to maintain and improve your fitness from the comfort of your home. By understanding the essential equipment, following a straightforward setup process, and incorporating thoughtful accessories, you can create a personalized indoor cycling experience that rivals dedicated stationary bikes.
Whether you’re looking to escape bad weather, stick to a structured training plan, or simply enjoy the convenience of a home workout, the practice of transforming your road bike into an indoor trainer opens up a world of possibilities. Embrace this practical approach to fitness and discover the joy of consistent, comfortable, and effective indoor cycling.
Frequently Asked Questions
What are the primary ways to turn my bike into a stationary bike?
The two main methods are using a bike trainer or a set of cycling rollers. A trainer securely holds your bike in place, usually by the rear wheel axle, while rollers allow your bike to balance freely on a series of cylinders, requiring more core engagement. Both methods effectively turn your outdoor bike into a stationary exercise machine for indoor riding.
What equipment is necessary to convert a regular bike into a stationary one?
For a bike trainer, you’ll need the trainer unit itself, which often includes a skewer compatible with your bike’s rear wheel, and optionally a front wheel block for stability. If using rollers, you’ll primarily need the roller unit. Ensuring your bike’s tires are in good condition and inflated properly is also essential for a smooth and effective ride.
Can I use any type of bike with a stationary bike trainer or roller?
Most road bikes and mountain bikes can be used with trainers and rollers, though mountain bikes often require slick tires to reduce noise and wear. Specific compatibility can vary based on axle type (quick release vs. thru-axle) and wheel size, so always check the trainer or roller specifications. Bikes with very unusual frame geometries or hub spacing might not fit all setups.
Is turning my bike into a stationary bike safe for the bike’s frame and components?
Generally, using a bike trainer or rollers is safe for your bike, as long as it’s set up correctly and your bike is in good condition. Trainers can put some stress on the rear axle and dropout, especially with more aggressive riding, so ensure proper installation. Rollers are gentler on the bike as the frame is not clamped, but regular maintenance remains important regardless of use.
How do I adjust the resistance when using my bike as a stationary setup?
For most bike trainers, resistance is adjusted either manually via a remote lever mounted on your handlebars or automatically if you have a smart trainer. With rollers, resistance is primarily controlled by your bike’s gears, similar to riding on the road. Some advanced roller systems may also offer magnetic resistance units that can be added for a greater challenge.
What are the main differences between using a bike trainer versus rollers to make my bike stationary?
Bike trainers hold your rear wheel or bike frame securely, offering stability and allowing for higher intensity efforts without balance concerns. Rollers, conversely, require constant balance and core engagement, closely mimicking outdoor riding feel and improving bike handling skills. Trainers are generally easier for beginners, while rollers offer a more dynamic and engaging workout experience.
When you purchase a product through Amazon links on EllipticalKing.com, we may earn a small commission at no extra cost to you. This helps support the site and keep our content free. As an Amazon Associate, We earn from qualifying purchases