
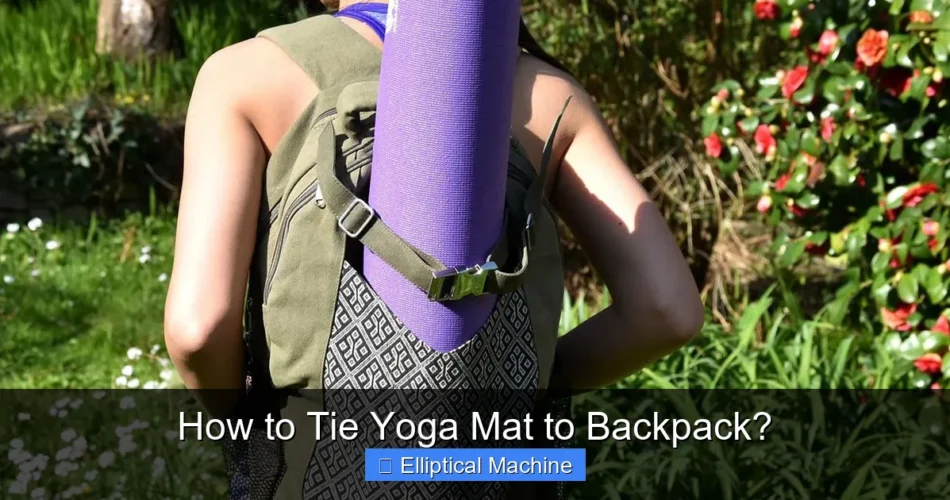
How to Tie Yoga Mat to Backpack? involves securing your rolled mat to the exterior of your pack using its existing straps, additional bungee cords, or a dedicated carrier. This technique is essential for anyone who regularly commutes to a yoga studio, travels with their mat, or simply needs to keep their hands free. Mastering this process ensures your mat is safely transported without hindering your movement or balance.
Knowing how to properly attach your yoga mat to your backpack offers unparalleled convenience, allowing you to carry other essentials and maintain comfort on the go. This guide will walk you through various methods, helping you find the perfect solution for your specific needs and gear.
Quick Answers to Common Questions
What’s the simplest method for how to tie a yoga mat to a backpack without extra gear?
The easiest method for how to tie a yoga mat to a backpack is often to use your bag’s existing compression straps. Simply unbuckle them, place your rolled mat, and re-fasten tightly over it, typically on the bottom or side.
Will my yoga mat swing around a lot if I just strap it to the bottom of my backpack?
Not if you secure it properly! Ensure it’s cinched tightly with at least two points of contact, like two compression straps, to prevent any uncomfortable swinging while you’re on the move.
What if my backpack doesn’t have any external straps to tie my yoga mat?
No problem! You can easily use a couple of bungee cords or even a dedicated yoga mat carrier strap to attach it securely. Just loop them around your rolled mat and then attach them to any available loops or handles on your backpack.
📑 Table of Contents
Why Carry Your Yoga Mat Externally?
Transporting a yoga mat can often be an awkward affair, especially if it’s large or heavy. Carrying it by hand quickly becomes cumbersome, leaving you with fewer free hands for things like opening doors, checking your phone, or managing other bags. Furthermore, stuffing a yoga mat inside a backpack is rarely practical, as it consumes a significant amount of interior space that could otherwise be used for clothing, books, or a lunchbox.
Attaching your mat to the outside of your backpack offers several distinct advantages:
- Hands-Free Convenience: The most obvious benefit is freeing up your hands, making your commute or journey much smoother.
- Optimized Interior Space: Keeps your backpack’s main compartment clear for other necessities, perfect for students, commuters, or travelers.
- Improved Balance: Properly secured, your mat’s weight can be distributed more evenly, contributing to better posture and less strain.
- Air Circulation: If your mat is slightly damp from a sweaty session, carrying it externally allows it to air out, preventing mildew and odors.
- Accessibility: Your mat is easy to grab when you arrive at your destination and equally simple to re-attach when you’re done.
Assessing Your Backpack and Yoga Mat
Before you begin the process of securing your yoga mat, it’s crucial to evaluate both your backpack and your mat. Not all combinations are created equal, and understanding their characteristics will help you choose the most effective and secure attachment method.
Your Backpack’s Features
- Existing Straps: Does your backpack have compression straps on the sides, top, or bottom? Many hiking, travel, or even some commuter backpacks come with adjustable straps designed for attaching extra gear like sleeping bags, jackets, or tents. These are often ideal for a yoga mat.
- Daisy Chains or Webbing Loops: Some backpacks feature external loops of webbing (daisy chains) or small fabric loops. These provide attachment points for carabiners or external straps.
- Size and Capacity: A larger, more structured backpack will generally provide better stability for an attached mat than a small, flimsy daypack. Consider the weight and bulk your backpack can comfortably handle.
- Overall Design: Does the backpack’s shape allow for a mat to be carried horizontally or vertically without obstructing zippers or pockets?
Your Yoga Mat’s Characteristics
- Material and Weight: Thicker, heavier mats (like natural rubber or performance mats) require more robust attachment methods to prevent sagging or swinging. Lighter, thinner travel mats are more forgiving.
- Length and Diameter When Rolled: A very long mat might protrude uncomfortably when carried horizontally, while a very thick roll might be challenging to secure tightly.
- Flexibility: Some mats are very stiff when rolled, while others are more pliable. This can affect how tightly they can be cinched.
Once you have a clear understanding of your gear, you can choose the best strategy for attaching your mat securely.
Common Methods for Attaching Your Yoga Mat
There are several tried-and-true approaches to attaching your yoga mat to a backpack, each with its own advantages. The best method depends on your backpack’s design and your personal preference.
Method 1: Using Integrated Backpack Straps (Horizontal Carry)
This is arguably the most common and often the most secure method, ideal for backpacks with existing compression or gear straps, especially at the bottom or sides.
- Roll Your Mat Tightly: Start by rolling your yoga mat as tightly and evenly as possible. A neat, compact roll is easier to secure and less likely to sag.
- Position the Mat: Place the rolled mat either horizontally across the bottom of your backpack or vertically along one side. The horizontal carry is often preferred for stability.
- Thread and Cinch: If using bottom straps, thread each strap around the mat and through its buckle. Pull the straps taut, ensuring the mat is held firmly against the backpack. If using side straps for a vertical carry, do the same, making sure the mat is centered and doesn’t interfere with your arm movement.
- Check for Security: Give the mat a gentle tug. It should not move or slip.
Method 2: Using External Straps or Bungee Cords
If your backpack lacks integrated straps, or if you need extra security, dedicated yoga mat straps, luggage straps, or bungee cords are excellent solutions.
- Acquire Straps: Purchase a set of adjustable luggage straps, bungee cords with hooks, or specialized yoga mat carry straps.
- Roll and Position: Roll your mat tightly and position it on your backpack as desired (horizontally at the top/bottom, or vertically on the side).
- Secure with Straps: If using luggage straps, wrap one strap around the mat and the backpack’s body near one end of the mat, buckling and tightening it. Repeat with the second strap near the other end of the mat. If using bungee cords, hook one end to a sturdy loop or strap on your backpack, wrap the cord around the mat and backpack, and hook the other end securely. Ensure tension is even.
- Test Stability: Ensure the straps are tight enough to prevent the mat from wiggling or slipping.
Method 3: The Vertical Side Carry
Some backpacks are designed with side compression straps that work well for a vertical carry. This approach keeps the mat close to your body and can be good for narrower mats or packs.
- Tight Roll: Roll your mat as compactly as possible.
- Position Vertically: Stand the rolled mat upright along one side of your backpack. Ensure it doesn’t extend too far above or below the pack, potentially hitting your head or dragging on the ground.
- Utilize Side Straps: Use the backpack’s side compression straps to cinch the mat tightly against the pack’s body. If you have two sets of side straps (top and bottom), use both for maximum stability.
- Assess Balance: Check that the weight distribution feels comfortable. If the mat is heavy, a vertical side carry might create an imbalance.
Method 4: Specialized Yoga Mat Carriers
For ultimate convenience, a dedicated yoga mat carrier or bag might be integrated with or attached to your backpack.
- Built-in Sleeves: Some larger travel or gym backpacks feature specific external sleeves or pockets designed to slide a rolled mat into.
- Clip-on Carriers: There are standalone yoga mat bags that have clips or hooks, allowing them to be attached to daisy chains or external loops on a backpack.
- Convertible Options: Some yoga mat bags can convert into a small backpack or have straps to attach to a larger pack.
Step-by-Step Guide: The Horizontal Carry Method
The horizontal carry method, often utilizing bottom compression straps, is a popular choice due to its stability and balanced weight distribution. Here’s a detailed breakdown:
Step 1: Prepare Your Yoga Mat
- Roll Tightly: Lay your mat flat and roll it up from one end, aiming for the tightest, most compact cylinder possible. A loose roll will sag and be harder to secure.
- Use a Mat Strap (Optional): If you have a separate yoga mat strap (often an adjustable loop strap), use it to keep your mat rolled tightly before attaching it to your backpack. This provides an extra layer of security.
Step 2: Position the Mat on Your Backpack
- Locate Attachment Points: Identify the horizontal compression straps usually found at the bottom of your backpack. These are typically adjustable webbing straps with buckles.
- Place the Mat: Lay the rolled yoga mat across the bottom of your backpack, perpendicular to its length. Ensure it’s centered to help with weight distribution.
Step 3: Thread and Secure the Straps
- Route the Straps: Take each bottom strap and bring it up and over the top of your rolled mat.
- Fasten the Buckles: Connect the strap end to its corresponding buckle on the other side of the mat.
- Cinch Tightly: Pull the loose ends of the straps to tighten them. Ensure the mat is pressed firmly against the bottom of the backpack. The straps should be snug enough that the mat doesn’t wiggle or slide when you shake the pack.
Step 4: Check for Stability and Comfort
- Perform a Shake Test: Gently shake your backpack. The mat should remain securely in place with minimal movement.
- Wear the Backpack: Put the backpack on and walk around a bit. Does the mat feel balanced? Does it rub against your legs or snag on anything? Adjust the straps as needed for optimal comfort and stability.
- Adjust Compression: If your backpack has additional side compression straps, you can use these to further stabilize the pack’s contents and potentially reduce any slight movement from the mat if it’s particularly long.
Tips for a Secure and Balanced Carry
Beyond the basic methods, a few extra considerations can enhance the security and comfort of carrying your yoga mat.
Weight Distribution is Key
- Center the Load: Always try to center your mat on the backpack, whether carried horizontally or vertically. Off-center weight can pull your backpack to one side, leading to discomfort or strain.
- Heavy Mats Down Low: For heavier mats, carrying them horizontally across the bottom of your pack is generally best. This keeps the weight lower and closer to your center of gravity, improving overall balance.
Preventing Swing and Sag
- Tight is Right: The tighter you roll your mat and the tighter you cinch the straps, the less likely it is to swing, sag, or come loose.
- Double Strapping: If using external straps, always use at least two straps placed at either end of the mat roll. This prevents the mat from pivoting around a single strap.
- Consider an Inner Compression Strap: Some backpacks have an internal compression strap. If you’re carrying a heavy mat horizontally, you might be able to loop this strap around the mat through the bottom opening of the main compartment for extra security.
Protecting Your Mat
- Avoid Dragging: Ensure your mat is positioned high enough that it won’t drag on the ground, especially when setting your backpack down or walking on uneven terrain.
- Weather Protection: If you’re carrying your mat externally in inclement weather, consider a waterproof sleeve or a light rain cover for the mat, or even for the entire backpack.
- Mind the Obstacles: Be mindful of your increased width or length when navigating crowded spaces, doorways, or public transport.
Comparison of Carry Methods
Understanding the pros and cons of different attachment styles can help you select the ideal way to carry your mat. This table summarizes the main characteristics:
| Method | Pros | Cons | Ideal For |
|---|---|---|---|
| Integrated Horizontal (Bottom Straps) | Very stable, excellent weight distribution, frees up interior space. | Requires suitable backpack straps, can make accessing bottom pocket difficult. | Medium to heavy mats, longer commutes, hiking. |
| Integrated Vertical (Side Straps) | Good for narrow mats, keeps mat close to body, quicker access. | Can create uneven weight distribution, may hinder arm movement for wider mats. | Lighter mats, short distances, crowded public transport. |
| External Straps/Bungee Cords | Highly versatile, works with most backpacks, strong security. | Requires purchasing extra gear, can be less streamlined than integrated straps. | Any mat/backpack combo lacking integrated straps, maximum security needs. |
| Specialized Carriers | Designed for purpose, often integrated aesthetic, maximum convenience. | Less versatile, often specific to certain mat sizes or backpack brands. | Dedicated yogis, those prioritizing seamless integration. |
Choosing the best method often comes down to experimentation and personal preference. Don’t hesitate to try a few different approaches to see what feels most secure and comfortable for your daily routine.
Conclusion
Successfully attaching your yoga mat to your backpack transforms your travel experience, offering unparalleled freedom and convenience. From utilizing your pack’s built-in compression straps for a secure horizontal carry to employing external bungee cords for added versatility, there’s a solution for nearly every backpack and mat combination. Remember to prioritize a tight roll, even weight distribution, and thorough strap cinching to prevent any unwanted movement.
By following the steps and tips outlined in this guide, you can confidently carry your yoga mat, ensuring it arrives at your destination safely and without burden. Master this crucial skill, and your journey to and from the studio will be much smoother and more enjoyable, leaving you ready to focus on your practice.
Frequently Asked Questions
What’s the easiest way to attach my yoga mat to a backpack?
The simplest method often involves using your backpack’s existing compression straps. Roll your yoga mat tightly and slide it under the top or bottom straps, then cinch them down securely. This provides a stable attachment point for your yoga mat.
Can I attach my yoga mat vertically or horizontally to my backpack?
Yes, you can attach your yoga mat both ways, depending on your backpack design and preference. Horizontal attachment is common using bottom straps, while vertical attachment might use side compression straps or a dedicated mat strap kit, which can be useful for narrower mats or taller backpacks.
How do I prevent my yoga mat from swinging or falling off my backpack?
Ensure your yoga mat is rolled as tightly as possible before attaching it. Use multiple attachment points if available, such as both top and and bottom straps, and tighten them firmly. This minimizes movement and keeps your yoga mat stable while you’re on the go.
What if my backpack doesn’t have external straps for a yoga mat?
If your backpack lacks external straps, you can use bungee cords, a dedicated yoga mat strap, or even a couple of carabiners with some webbing. Loop these around your tightly rolled yoga mat and secure them to available loops or handles on your backpack. This provides a makeshift but effective way to tie your yoga mat.
Will tying a yoga mat to my backpack make it uncomfortable to carry?
It can, depending on how and where you tie your yoga mat. To minimize discomfort, try to position the mat so it doesn’t protrude too far or rub against your body. Centering the weight and ensuring it’s not pressing into your back or legs will help maintain carrying comfort.
Are there any accessories that make tying a yoga mat easier?
Absolutely! Many specialized yoga mat carrier straps or bungee cords with hooks are designed for this purpose. Some backpacks even come with dedicated external loops or straps specifically designed for carrying a yoga mat or similar bulky items, making the process much smoother.
When you purchase a product through Amazon links on EllipticalKing.com, we may earn a small commission at no extra cost to you. This helps support the site and keep our content free. As an Amazon Associate, We earn from qualifying purchases