
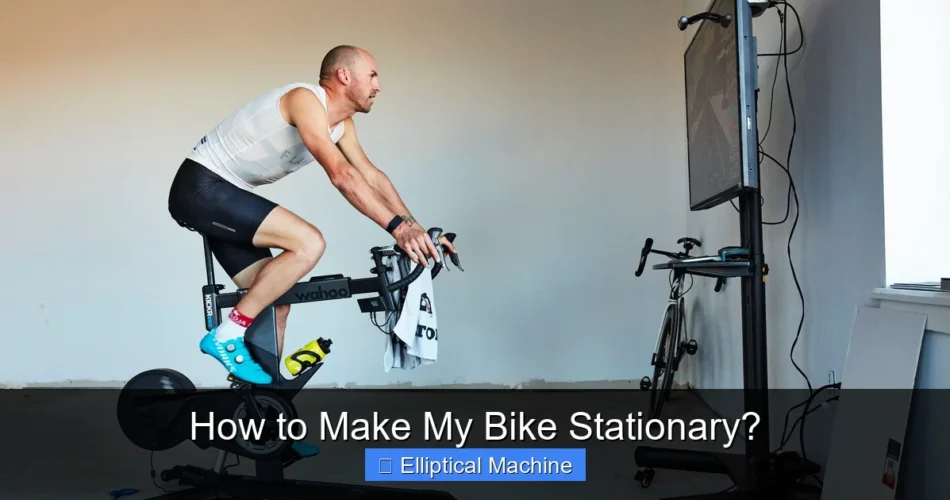
How to Make My Bike Stationary? involves converting your outdoor bicycle into an indoor exercise machine, primarily through the use of trainers or rollers. This technique allows cyclists to maintain their training regimen regardless of weather conditions or time constraints, offering a convenient and effective way to stay fit. The practice transforms your existing bike into a versatile fitness tool, providing a consistent workout experience.
This approach to indoor cycling has evolved significantly, moving beyond basic resistance units to sophisticated smart trainers that integrate with virtual riding platforms. Understanding the various methods and equipment available is key to creating a stationary bike setup that meets your personal fitness goals and budget.
Quick Answers to Common Questions
What’s the quickest way to turn my regular bike into a stationary one?
The most common and easiest method to make your bike stationary is to use a bike trainer. You simply mount your bike’s rear wheel to the trainer, and it provides resistance for an effective indoor workout, making “How to Make My Bike Stationary?” super simple!
Do I need special gear, or can I just prop my bike up?
You’ll definitely need specialized equipment like a bike trainer or rollers to keep your bike stable and provide resistance. Simply propping it up isn’t safe or effective for indoor riding, so invest in the right gear for “How to Make My Bike Stationary?”.
Are bike trainers hard to set up?
Not at all! Most modern bike trainers are designed for quick and easy setup, often taking just a few minutes to get your bike mounted and ready to ride. Learning “How to Make My Bike Stationary?” with a trainer is a very straightforward process.
📑 Table of Contents
- Understanding Your Options for Stationary Cycling: Trainers vs. Rollers
- Step-by-Step Guide to Setting Up a Wheel-On Trainer
- The Direct-Drive Trainer Approach for Stationary Cycling
- Mastering Bicycle Rollers: A Unique Stationary Bike Experience
- Optimizing Your Stationary Setup: Accessories and Enhancements
- Troubleshooting Common Issues and Maintenance for Your Stationary Bike Setup
- Conclusion
Understanding Your Options for Stationary Cycling: Trainers vs. Rollers
When considering how to make your bike stationary, the primary decision lies between bike trainers and rollers. Both serve the purpose of allowing indoor cycling, but they offer distinct experiences and benefits. Trainers typically provide a more stable and controlled environment, while rollers demand more balance and mimic outdoor riding feel.
Wheel-On Trainers: Versatility and Accessibility
Wheel-on trainers are among the most popular choices for converting a bike into a stationary unit due to their affordability and ease of use. These trainers work by clamping the rear wheel of your bicycle, with the tire resting on a resistance unit. Different types of resistance units offer varying ride characteristics:
- Magnetic Trainers: These use magnets to create resistance, offering a relatively quiet and consistent workout. Resistance levels can often be adjusted manually via a lever on your handlebars.
- Fluid Trainers: Offering a more realistic road feel, fluid trainers use a silicone-based fluid to create resistance. As you pedal faster, the resistance naturally increases, providing a smoother and quieter experience than most magnetic trainers.
- Wind Trainers: While generally the loudest option, wind trainers are often the most economical. They use a fan to generate resistance; the faster you pedal, the greater the resistance.
Wheel-on trainers are a great entry point into indoor cycling, requiring minimal setup and allowing for quick transitions between indoor and outdoor riding.
Direct-Drive Trainers: Precision and Performance
Direct-drive trainers are a more advanced solution for indoor cycling. Instead of the rear wheel resting on a roller, you remove the rear wheel entirely and connect the bike’s drivetrain directly to the trainer’s cassette. This design offers several advantages:
- Improved Accuracy: Direct-drive trainers often provide more accurate power readings and resistance control.
- Quieter Operation: Eliminating tire-on-roller noise makes them significantly quieter than wheel-on trainers.
- No Tire Wear: Since your tire isn’t in contact with a roller, there’s no wear and tear on your bike’s rear tire.
- Enhanced Stability: Generally more stable than wheel-on trainers, especially during high-intensity efforts.
Many direct-drive trainers are “smart” trainers, meaning they can connect to apps like Zwift or TrainerRoad, automatically adjusting resistance to simulate hills or structured workouts. This makes them ideal for serious training and immersive virtual riding experiences.
Bicycle Rollers: The Art of Balance and Smoothness
Bicycle rollers consist of three drums over which your bicycle wheels spin. Unlike trainers, rollers don’t fix your bike in place; instead, you ride your bike on top of them, requiring balance and concentration. This unique stationary setup offers a different set of benefits:
- Improved Bike Handling: Riding rollers actively engages your core and develops a smoother pedal stroke, enhancing your outdoor bike handling skills.
- Natural Ride Feel: Many cyclists find the sensation of riding on rollers to be closer to actual outdoor cycling compared to fixed trainers.
- Portability: Most rollers fold up for easy storage and transport.
While rollers have a steeper learning curve, mastering them provides a highly engaging and beneficial indoor cycling experience, making your bike stationary in a dynamic way.
Step-by-Step Guide to Setting Up a Wheel-On Trainer
Setting up a wheel-on trainer is straightforward, making this method one of the easiest ways to convert your bike into a stationary exercise machine. Follow these steps for a quick and secure setup.
Choosing the Right Trainer for Your Bike
Before setup, ensure your chosen wheel-on trainer is compatible with your bike’s rear axle type (quick release or thru-axle) and wheel size. Most modern trainers accommodate various wheel sizes (26″, 27.5″, 29″, 700c) and axle standards with appropriate adapters, often included or sold separately. Consider your budget and desired noise level when selecting between magnetic, fluid, or wind resistance types.
Essential Setup Steps for a Fixed Bike
- Unfold the Trainer: Most trainers fold for storage. Unfold the legs and ensure they are locked securely in place on a level, stable surface. A trainer mat underneath can protect your floor and dampen vibrations.
- Adjust Roller Tension: Locate the resistance unit and the tension adjustment knob. You’ll typically need to adjust this after mounting the bike.
- Mount Your Bike: Open the trainer’s quick-release skewer (or thru-axle adapters). Carefully lift your bike and align the rear axle with the trainer’s mounts. Close the skewer tightly, ensuring the bike is firmly seated and centered. The quick release on your bike’s wheel is replaced by a trainer-specific quick release for better grip and durability.
- Engage the Resistance Unit: Spin your rear wheel to ensure it is centered on the roller. Then, tighten the resistance unit’s knob until the roller makes firm contact with the tire. A good starting point is when the roller is pressed against the tire so that the tire depresses slightly, usually a few turns after initial contact. Some recommend two to three full turns.
Calibration and First Ride
Once your bike is mounted, give it a quick spin to check stability and alignment. For smart trainers or those with adjustable resistance, you might need to perform a “spin down” calibration using the trainer’s app to ensure accurate power readings. Start pedaling slowly to get a feel for the resistance and stability. Adjust the tension slightly if the tire slips, or if there’s too much friction. Always ensure proper tire pressure for optimal performance and reduced slippage.
The Direct-Drive Trainer Approach for Stationary Cycling
Direct-drive trainers represent a premium solution for cyclists serious about indoor training. Their design fundamentally changes how your bike interfaces with the stationary unit, offering significant advantages in performance and ride quality.
Benefits of Direct-Drive for Your Stationary Setup
Choosing a direct-drive trainer for your stationary bike setup comes with several compelling benefits:
- Superior Ride Feel: By connecting directly to the drivetrain, these trainers often provide a smoother, more realistic pedaling experience, closely mimicking outdoor riding.
- Increased Power Accuracy: Direct measurement of power output at the cassette typically results in highly accurate and consistent data, crucial for structured training.
- Reduced Noise and Vibrations: Without tire-on-roller contact, direct-drive trainers are significantly quieter, making them ideal for shared living spaces or early morning workouts.
- No Tire Wear or Slippage: Eliminating the rear wheel from the equation means no concerns about tire wear, heat buildup, or slippage during intense efforts.
- Enhanced Stability: The sturdy construction and direct connection often lead to a more stable platform, even during out-of-the-saddle efforts.
Installation Considerations
Setting up a direct-drive trainer requires a few additional steps compared to wheel-on models:
- Cassette Compatibility: Most direct-drive trainers require you to install your own cassette. Ensure it matches the gearing and speed (e.g., 10-speed, 11-speed, 12-speed) of your bike’s drivetrain. You might need a cassette lockring tool and chain whip for installation.
- Axle Adapters: Similar to wheel-on trainers, check for compatibility with your bike’s rear axle (quick release or thru-axle) and ensure you have the correct adapters installed on the trainer.
- Removing the Rear Wheel: Shift your bike into the smallest cog, open the quick release or thru-axle, and carefully remove your bike’s rear wheel.
- Mounting the Bike: Align your bike’s chain with the cassette on the direct-drive trainer. Guide the dropouts onto the trainer’s axle, ensuring the chain is properly seated on a cog. Close the trainer’s quick release or tighten the thru-axle securely.
Smart Trainer Features for an Immersive Experience
Many direct-drive trainers are “smart” trainers, offering advanced functionalities that elevate the indoor cycling experience:
- ANT+ and Bluetooth Connectivity: Allows seamless connection to training apps, bike computers, and other sensors.
- ERG Mode: The trainer automatically adjusts resistance to maintain a target wattage, regardless of your cadence, ideal for structured interval training.
- Virtual Ride Simulation: When connected to platforms like Zwift or Rouvy, the trainer can simulate gradients, making virtual climbs feel incredibly realistic.
These features transform your bike into a dynamic, interactive stationary cycling platform.
Mastering Bicycle Rollers: A Unique Stationary Bike Experience
Bicycle rollers offer a distinct and highly engaging method for making your bike stationary. They challenge your balance and finesse, providing a workout that closely mimics the demands of outdoor riding.
Getting Started with Rollers
Riding rollers successfully requires a bit of practice, but the rewards in improved bike handling and pedal stroke are significant. Here’s how to begin:
- Set Up Safely: Place your rollers in a doorway or next to a sturdy wall where you can easily brace yourself. A wide-open space might seem tempting, but initial support is crucial.
- Gear Selection: Start in an easy-to-moderate gear that allows you to maintain a good cadence without excessive effort. This helps with stability.
- Mounting the Bike: Carefully mount your bike, placing both hands on the handlebars. With one foot on the ground, clip in with the other. Push off the wall/doorway and try to clip in your second foot as quickly as possible.
- Focus Forward: Resist the urge to look down at your wheels. Fix your gaze on a point about 10-15 feet in front of you, just as you would outdoors.
- Smooth Pedaling: Maintain a consistent, smooth pedal stroke. Jerky movements will quickly throw you off balance. Keep your core engaged and your arms relaxed.
It’s normal to wobble and even fall off a few times initially. Persistence is key, and you’ll find your rhythm quickly.
Developing Balance and Technique on This Stationary Setup
Once you’re comfortable simply staying upright, you can begin to refine your technique:
- One-Handed Riding: Practice riding with one hand off the handlebars, then the other. This builds confidence and core strength.
- Standing Up: Experiment with standing out of the saddle. Start with short bursts and gradually increase the duration. This is more challenging on rollers but excellent for developing stability.
- High Cadence Drills: Rollers are fantastic for improving your pedaling efficiency. Practice spinning at high cadences (100-110 RPM) with minimal power to smooth out your pedal stroke.
The continuous feedback from rollers helps identify and correct imbalances, making you a more efficient and confident rider on your bike, even when it’s stationary.
Safety Tips for Roller Riding
- Helmet On: While you’re not moving across the ground, a fall on rollers can still be painful. Wearing a helmet is a good practice.
- Clear the Area: Ensure there are no obstacles around your roller setup.
- Fan for Cooling: Without airflow, you’ll heat up quickly. A fan is essential to prevent overheating and maintain focus.
- Stay Hydrated: Keep a water bottle within easy reach.
- Don’t Be Afraid to Bail: If you feel like you’re losing control, unclip and put a foot down. It’s better than an uncontrolled fall.
Optimizing Your Stationary Setup: Accessories and Enhancements
Once you’ve decided on how to make your bike stationary, enhancing your setup with the right accessories can significantly improve comfort, performance, and overall enjoyment. These additions can transform a basic indoor ride into an immersive and highly effective training session.
Essential Comfort and Protection
- Floor Mat: A dedicated trainer mat placed under your bike and trainer protects your floor from sweat, oil, and vibrations. It also helps dampen noise.
- Sweat Guard/Catcher: A sweat guard stretches from your handlebars to your seatpost, catching corrosive sweat before it drips onto your bike’s frame, headset, or bottom bracket.
- Front Wheel Block/Riser: For wheel-on and direct-drive trainers, a front wheel block elevates the front wheel, leveling your bike and preventing excessive weight transfer to your hands, making for a more comfortable and natural riding position.
Cooling and Hydration
- High-Powered Fan: Indoor cycling generates significant body heat with no natural airflow. A powerful fan (or even two) is arguably the most crucial accessory for preventing overheating and maintaining performance. Position it to mimic headwind.
- Multiple Water Bottles: Keep at least two large water bottles within easy reach. Hydration is even more critical indoors due to increased sweat rates.
Entertainment and Connectivity for Your Indoor Cycling
- Tablet/Monitor Stand: A sturdy stand to hold your tablet or a monitor allows you to easily view virtual training apps, movies, or shows.
- Virtual Training Platforms: Subscriptions to apps like Zwift, TrainerRoad, Sufferfest (Wahoo SYSTM), or Rouvy unlock a world of structured workouts, virtual group rides, and races, transforming the solitary nature of indoor cycling.
- ANT+/Bluetooth Dongle: If your computer doesn’t have built-in ANT+ or robust Bluetooth, a dedicated dongle ensures reliable connection between your trainer, heart rate monitor, and computer.
Performance Monitoring Tools
- Heart Rate Monitor: A chest strap or optical sensor provides valuable data on your effort level and helps you stay within specific training zones.
- Power Meter (if not built into trainer): While many smart trainers have integrated power meters, external power meters (crank-based, pedal-based) can offer a consistent power reading across all your bikes, indoor and outdoor.
- Bike Computer: A bike computer mounted on your handlebars can display real-time data from your sensors and sometimes control smart trainers.
Troubleshooting Common Issues and Maintenance for Your Stationary Bike Setup
Ensuring your stationary bike setup runs smoothly requires occasional troubleshooting and regular maintenance. Addressing minor issues proactively can prevent larger problems and extend the life of your equipment.
Noise and Vibrations
- Trainer Mat: A thick mat underneath your trainer and bike can significantly reduce noise and vibrations transmitted to the floor.
- Level Surface: Ensure your trainer is on a completely level surface. Unevenness can cause wobbling and increase noise. Adjust trainer feet if possible.
- Tire Pressure (Wheel-On Trainers): Incorrect tire pressure is a common culprit for noise and slippage. Inflate your rear tire to the manufacturer’s recommended pressure or slightly higher (e.g., 90-110 PSI for road bikes) for optimal contact and reduced noise.
- Trainer Tension (Wheel-On Trainers): Too little tension can cause the tire to slip, creating noise. Too much tension can cause excessive tire wear and noise. Find the sweet spot (usually 2-3 turns after initial contact).
- Bike Drivetrain: A dirty or poorly lubricated chain, worn cassette, or misaligned derailleur can contribute to noise. Keep your drivetrain clean and well-maintained.
Tire Wear and Pressure (Wheel-On Trainers)
If you’re using a wheel-on trainer, regular road tires can wear out quickly due to the friction with the roller. Consider these solutions:
- Trainer Tire: Invest in a dedicated trainer tire. These are made from harder compounds designed to withstand the heat and friction of trainers, offering better durability and often reduced noise. They are typically red or blue and are not suitable for outdoor riding.
- Proper Inflation: Always ensure your tire is correctly inflated before each session to minimize wear and prevent slippage.
Trainer Calibration Checks
For smart trainers, regular calibration (often called a “spin down” or “zero offset”) is crucial for maintaining power accuracy. Consult your trainer’s manual or app for specific instructions. Calibrate your trainer:
- Before your first ride.
- Periodically (e.g., once a week or every few rides).
- If there’s a significant temperature change in your training space.
Keeping Your Bike and Trainer Clean
Sweat is corrosive and can damage both your bike and trainer over time. Regular cleaning is essential:
- Wipe Down After Each Ride: Use a damp cloth to wipe down your bike frame, handlebars, and any exposed trainer parts to remove sweat.
- Drivetrain Cleaning: Regularly clean and lubricate your chain, cassette, and derailleur. Indoor riding can still accumulate grime from chain wear and sweat.
- Trainer Maintenance: Periodically check the trainer’s roller (for wheel-on) or cassette (for direct-drive) for any buildup of debris. Clean the resistance unit housing if it gets dusty.
Comparison of Stationary Bike Trainer Types
Here’s a quick overview to help you choose the best method for your indoor cycling needs:
| Feature | Wheel-On Trainer | Direct-Drive Trainer | Bicycle Rollers |
|---|---|---|---|
| Cost Range | Low to Mid | Mid to High | Mid |
| Setup Complexity | Easy | Moderate (cassette install) | Easy (but requires balance) |
| Noise Level | Moderate to Loud | Quiet to Very Quiet | Moderate (tire noise) |
| Ride Feel | Good, but can feel rigid | Excellent, very realistic | Most natural, dynamic |
| Stability | High | Very High | Low (requires active balance) |
| Tire Wear | Yes (recommend trainer tire) | No | Some (normal tire wear) | Power Accuracy | Moderate | High to Very High | No inherent power (can add) |
By understanding these options and maintaining your equipment, your stationary cycling setup will provide countless hours of effective training.
Conclusion
Making your bike stationary offers an incredibly versatile and effective way to continue your cycling journey indoors, regardless of external conditions. From the straightforward setup of wheel-on trainers to the immersive experience of direct-drive smart trainers and the skill-honing challenge of rollers, there’s a solution for every cyclist.
Each approach transforms your beloved bicycle into a powerful tool for fitness, allowing for consistent training, improved performance, and even virtual adventures. By understanding the distinct characteristics of each method, choosing appropriate accessories, and performing routine maintenance, you can create a personalized indoor cycling haven. Embrace this technique to keep your legs spinning and your fitness goals within reach, year-round.
Frequently Asked Questions
What are the primary ways to make my bike stationary?
The most common methods involve using either a bike trainer or a set of rollers. A bike trainer securely clamps your rear wheel, providing resistance, while rollers allow you to balance and ride freely on rotating cylinders. Both options effectively transform your outdoor bicycle into an indoor exercise machine.
What equipment is needed to make my bike stationary?
To make your bike stationary, you’ll primarily need either a bike trainer (wheel-on, direct drive) or a set of rollers. For trainers, you might also need a front wheel block for stability and a specific thru-axle adapter if your bike doesn’t have a standard quick release skewer. A mat to protect your floor and absorb sweat is also highly recommended.
Can I use any type of bike as a stationary bike?
Generally, yes, most road bikes, mountain bikes, and hybrid bikes can be adapted for use as a stationary bike. Compatibility largely depends on the type of trainer or rollers you choose and your bike’s rear axle type (quick release vs. thru-axle). Specific adapters are often available for bikes with thru-axles or non-standard wheel sizes.
Are there any safety considerations when making my bike stationary?
Yes, safety is important when making your bike stationary. Ensure your bike is securely mounted to the trainer or that you have adequate space and balance when using rollers to prevent falls. Proper ventilation is also crucial to avoid overheating, and always use a stable, level surface for your setup.
What are the benefits of making my bike stationary compared to buying a dedicated stationary bike?
Making your bike stationary offers the benefit of training on your actual bike, maintaining your personalized fit and feel. It’s often a more cost-effective solution than purchasing an entirely separate, dedicated stationary bike. This allows you to train indoors conveniently, regardless of weather conditions, using the equipment you already own and love.
When you purchase a product through Amazon links on EllipticalKing.com, we may earn a small commission at no extra cost to you. This helps support the site and keep our content free. As an Amazon Associate, We earn from qualifying purchases